
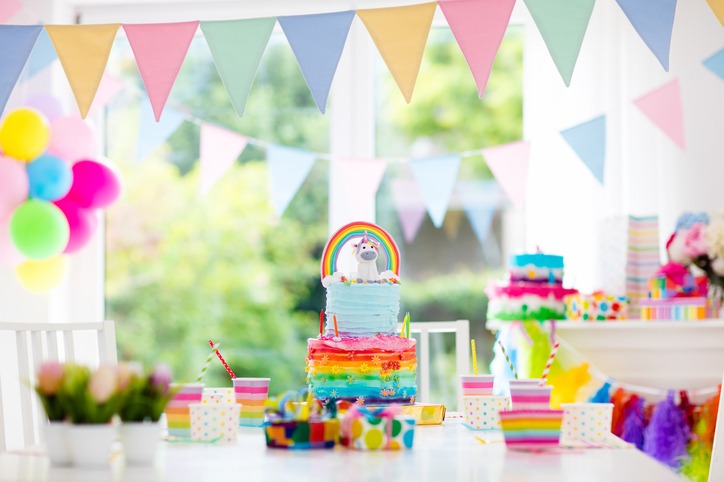
There are so many reasons to throw a party and even more reasons to decorate for the said party. Even if you’re not so-crafty, spending some time and a little bit of money to make your party area more festive can contribute to the event’s success.
While it’s easy to buy decorative items for convenience, making your own decoration will make your party unique and personalized. Plus, you can tweak the items to your liking and to the exact colors and styles you prefer.
Balloon wall
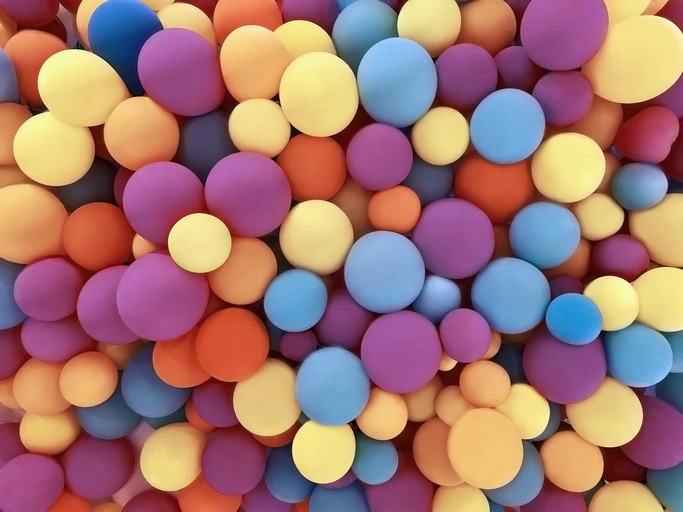
You can hang balloons at the end of the streamer or arrange some in an entrance, but that’s a pretty basic way to use balloons to decorate. Why not use lots of balloons and cover a wall with them for a big cheery effect? Construct a balloon wall where there is space, so you can use it as a photo backdrop for a photo booth!
As a general rule, use two to three balloons per foot of wall space, so estimate accordingly as to how many balloons you will need to cover a wall or a portion of a wall.
Materials:
- 100 or more pieces of balloons
- Hand pump
- Low-temperature glue gun
- Foamboard
- Gorilla tape
- Foil tassels, streamers, foliage, pampas grass, or flowers to decorate
Instructions:
- Inflate your balloons using your hand pump. For best effect, inflate them in various sizes: small, medium, and large.
- Create the shape of a balloon wall using foam board. Then, attach the foam board to the wall using double-sided gorilla tape. You can ditch the foam wall altogether if you want to cover the entire wall.
- Start attaching your balloons to the foam board using the glue gun. Add the largest balloons first, then fill the gaps with smaller ones. You can attach the filler balloons by sticking them to the previous adjoining balloon.
- When you’re pretty much finished, take a step back and do something else before adding more decorations.
- Take a look again at your balloon wall and see if it needs more balloons, extra decorations, or foliage. If you see it with fresh eyes, you’d most likely not overdo it!
Tissue paper pompoms
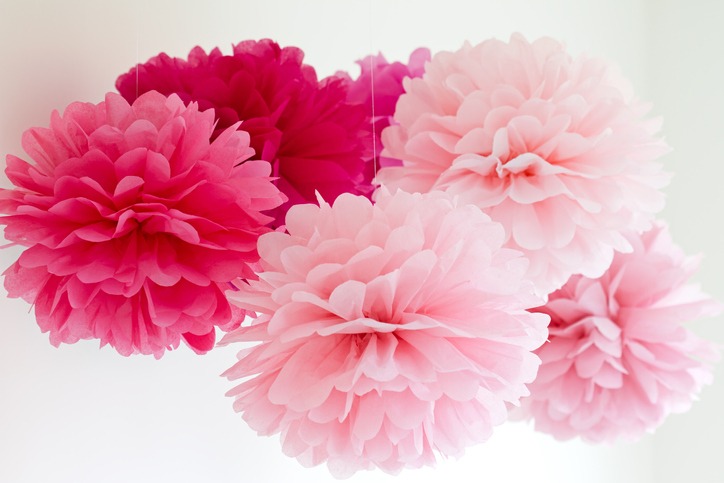
Real flowers are expensive, plus they wilt easily. Artificial flowers may look amazing, but sometimes they are costly too. If you want a cheap flower alternative that gives off major floral vibes, make some tissue paper pompoms. It won’t cost you too much, but it makes a huge difference in your décor. Make a lot and use them to decorate the wall for a backdrop, or use it as centerpieces.
Materials:
- 20 x 30 inches colored tissue paper
- 24-gauge white floral wire
- Monofilament
- Scissors
Instructions:
- Unfold sheets of tissue and stack eight sheets together. Make 1 ½-inchwide accordion folds, creasing with every fold.
- Cut an 18-inch piece of floral wire. Fold it in half, and slip it over the center of folded tissue. Twist. Using scissors, trim the ends of the tissue into rounded or pointy shapes.
- Separate the layers, pulling away from the center one at a time.
- Tie a length of monofilament to floral wire for hanging.
Balloon garland or balloon arch
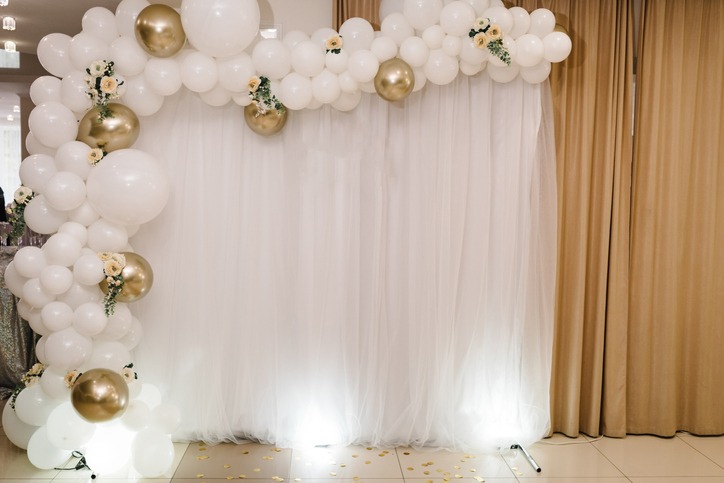
Balloons offer a lot of color and pizzazz to a party. It’s cheap, easy to buy, but makes a big difference when it comes to decorations. A pretty balloon arch can take your space to a new level. You can also make a balloon garland and attach it to the wall, along with streamers and other decorative backgrounds to make it a spruced-up photo wall. If you want to know how to make a balloon arch or a balloon garland, click here.
Hot air balloons
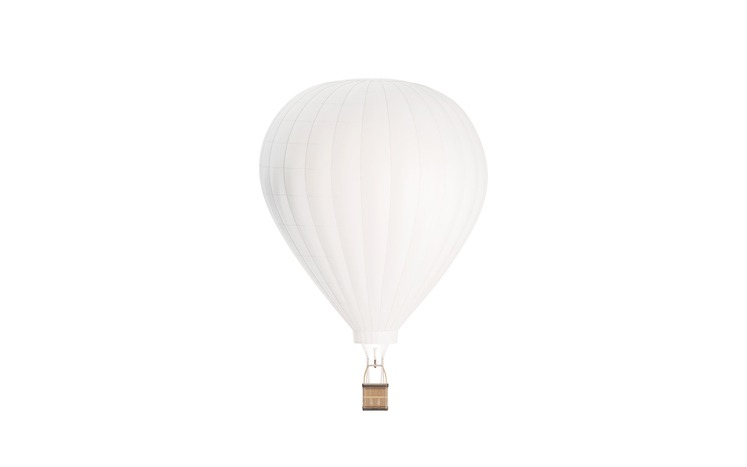
Regular balloons can be converted into miniature hot air balloons with just a few tricks. The result is cute, and kids and adults alike would love it. Plus, it’s a centerpiece that can float above the table and draw the eyes to that section of the room. Put it on top of a dessert table plopped against a cloud-decorated wall, and it would look perfect.
Materials:
- 12” white balloons
- Cardstock in rainbow colors
- Ruler
- X-Acto knife
- Twine
- 3m small wire hooks
- Scissors
- White thread
- Low-temperature hot glue gun
Instructions:
- Cut cardstock into strips measuring 11” x ½” each using an x-Acto knife and ruler. Lay five strips together horizontally, then hot glue the strip on top at the beginning, middle, and end of the pieces.
- Trim the cardstock so that the three support strips are flush with the height.
- Hot glue the ends of the cardstock piece together to create a loop. Slightly crease the edges to make the shape more rectangular.
- Cut cardstock into strips measuring 2 ½” x ½.” Weave the strips over and under the strips until you form a basket.
- Cut three pieces of twine that are 33” long each. Hot glue them together in the middle in an asterisk-like shape.
- Inflate and knot a white balloon, and drape the twine over the top of the balloon.
- Knot the thread around the center of the twine. Then, hot glue the CenterPoint of the twine to the top of the balloon. Let the glue cool down completely.
- Install a 3m hook onto the ceiling, then tie the end of the thread on the hook.
- Evenly space out the six strands of twine around the balloon. Attach the ends to the basket using hot glue.
- Now, it’s time for the decorations for the hot air balloon. Make mini buntings by cutting different colored cardstock into long strips of 1” wide. Stack a few strips, then cut diagonally to make a bunch of 1” wide triangles.
- Hot glue the triangles to the twine, leaving a little space between each of them.
- Hot glue the bunting in scallops along with the vertical twine in the balloon. Trim off any excess.
Ombre paper chain backdrop
A simple yet beautiful backdrop you can create is a paper chain wall hanging. Turn simple strips of paper into a large-scale backdrop! This one is an eye-popping decoration that can be displayed in your house even when the party is well over. It also adds a cool, three-dimensional texture that you can’t get from a simple framed artwork.
You need to choose cardstock in analogous colors (neighboring colors on a color wheel) to achieve the ombre effect for this project. Depending on your party’s color scheme, you can choose shades of blue to purple to pink or red to orange to yellow. You can also focus on a monochromatic tone, like, for instance, dark red to pink to white.
Materials:
- Cardstock paper in six colors
- Ruler and paper cutter or fringe tool
- Stapler
- Scissors
- Curtain rod or long dowel
Instructions:
- Cut a bunch of uniform paper strips measuring 1” by 8” using cardstock. Use a paper cutter with a ruler or a fringe tool for this, but you can also use scissors (though it’s more time-consuming). You need 80 strips of each color.
- Starting with your first color (preferably the darkest one), make a loop and staple it together. Add another piece of the same colored strip through the loop and staple. Continue making loops until you have four of the same color, then move on to the next color of cardstock in your ombre design. Finish your first chain.
- Make a second chain, repeating the steps in #2, but add one less chain this time. Repeat this step to create another matching chain.
- Continue making a set of two chains with one less loop than the previous chains.
- Once you have made 19 chains hang them from a wood dowel or curtain rod that’s long enough to hold the chains. Hide any staples by sliding the stapled part to the back of the ring.
- Insert the first loop of each chain on the dowel or curtain rod. The longest chain must be placed at the center, with the next longest on each side. The bottom of the backdrop must form a V-shape.
Sequined letter banner
Whatever message you want to display on your banner, you can make it more cheerful by adding sequins. When it comes to parties, going for sparkly or metallic can make a simple, understated, yet bold visual effect. A glittery phrase banner is perfect for celebrating your upcoming party.
Materials:
- Stretch sequin gold trim
- Scrap cardboard
- Hot glue gun
- X-Acto knife
- Metallic cord trim
- Bond paper and printer
Instructions:
- Print each letter you want to put in your banner in bond paper and use it as a template for cutting out your cardboard letter. Choose a simple, bold font in a size that’s under double the width of your sequin trim.
- Tape each letter to scrap cardboard and cut out the letter using an X-Acto knife.
- Glue the trim to the correct side of the cardboard letters. To make the ends look neat, fold and glue the ends under, so the trim won’t unravel. As you cover the cardboard with sequin trim, make sure both sides of the trim are going in the same direction.
- Once you have completed all the letters, line up your phrase backward, then glue the top back parts to your hanging cord. Let the hot glue set before hanging your garland.
Tulle table skirt
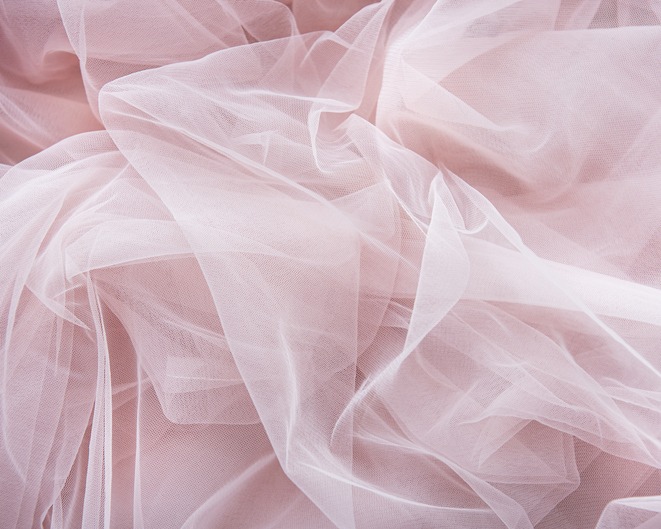
Add a touch of elegance and prettiness to your next party with a no-sew tulle table skirt. Decorate your dessert table or buffet table with this skirt, and you’ll be all set to have a beautiful decoration for a princess party, a unicorn party, or a mermaid party. Besides kids-themed parties, you can also use a tulle table skirt for a baby shower or a bridal shower party.
For this decoration, you need to measure the length of your table (or the perimeter if you have a round one) and count two yards per inch. Choose colors that will fit your theme. Also, choose fabric ribbons that will compliment your tulle colors.
Materials:
- Tulle
- Fabric ribbons in different colors
- 1” wide white fabric ribbon
- U-glue roll
- Pins or safety pins
Instructions:
- Measure two yards of tulle and cut.
- Fold it in half and create a loop with your hand.
- String the loop on the white ribbon.
- Repeat steps 1-3, alternating the colors of the tulle until you achieve the desired length.
- Once you’re finished, attach the skirt to the table using U-glue or pins to the edges of the table. Use pins if you’re attaching it to a tablecloth, then use U-glue to keep the tablecloth in place on top of the table, as the skirting may cause the tablecloth to sag.
- Cut different lengths of the colorful ribbons.
- Fold it in half and loop them randomly to the loops of the tulle.
Tassel garland
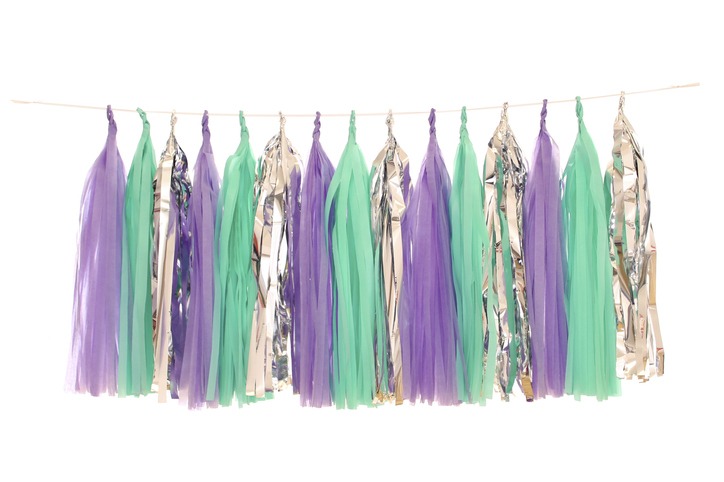
A colorful tassel garland made from tissue paper and twine is not just easy to do, but it’s cheap and versatile to use for decoration for any occasion. Sure, you can buy this from a store, but they tend to be pricier for their quality and rip off easily. Plus, if you’re making one on your own, you can customize the color combinations you use. Use the tassel garland to dress up a dessert table or snack table, jazz up a doorway, or frame a mantel.
Materials:
- Sheets of 20” x 20” colored tissue paper
- Scissors
- Decorative string or twine
- Baker’s twine
Instructions:
- Start by folding your piece of tissue paper in half. Then, fold each side of the tissue paper in half again. You will have two pieces that each have a fold.
- Take your scissors and cut a fringe down the entire length of the tissue paper. Leave the folded top untouched, and leave an inch of tissue paper uncut. Make the strips even and thick enough so they won’t rip too easily.
- Unfold the tissue and lay it out on a flat surface. You must have fringe on both sides with the uncut gap at the center.
- Carefully roll the uncut gap with the fringe on either side into a tube. Do this firmly but gently.
- Secure the loop using a small piece of string, which adds a tiny decorative detail to the tassel.
- Repeat the entire process until you’ve made a bunch of tassels.
- String all the tassels together on a baker’s twine in any color combination you like.
Colorful photo backdrop
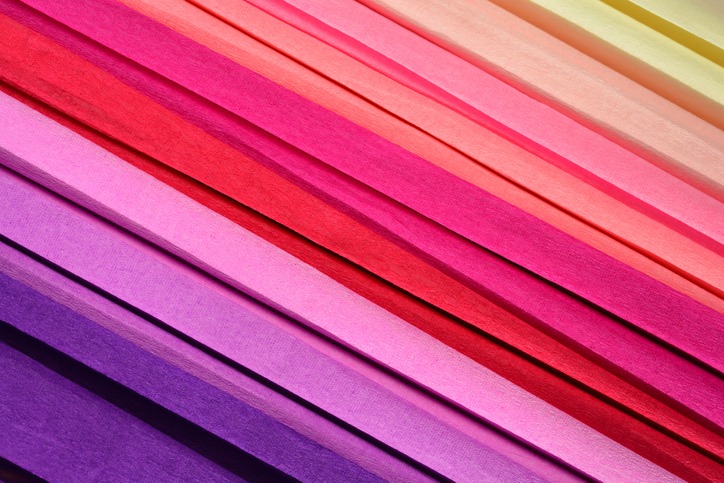
Backdrops are so great for many different purposes – from taking great photos to establishing the color theme of your party. In this world where the perfect Instagram-worthy photos are valued, making a backdrop for your party is a must. This crepe paper backdrop is a combination of easy, affordable, and durable. Use it to create a vibrant background for your guests to take photos or let it serve as a backdrop for a dessert table.
Materials:
- 12” wide crepe paper in 6-8 different shades
- Scissors
- Glue dots
Instructions:
- Choose the color of the crepe paper that will be on the bottom of the backdrop. Place glue dots along one edge of the crepe paper, 10-12 inches apart. Press it firmly to the crepe paper.
- Place the first sheet of paper up on the wall a few inches above the floor. Press the glue dots firmly while making sure that the paper is level all the way across. Decide how wide you’d like your backdrop to be during this point. Trim off the excess paper on either side of the paper is too wide.
- Add another strip of crepe paper using the same process. As you add, the bottom of the upper strip must fall in the front of the strip below. Continue adding strips until your backdrop reaches the desired height. Make sure that the strips are even and equal
Paper fans
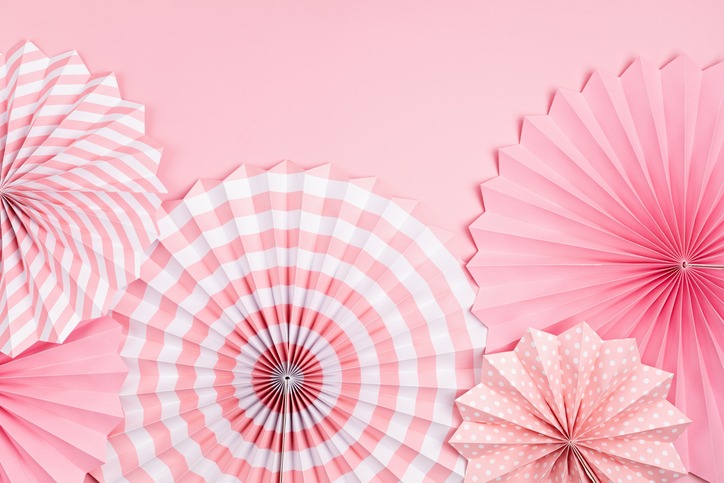
Paper fans are a classic decoration that works for any type of event. Using decorative paper, you can make a whole bunch, and you can hang them from above with a string, clustered in a wall, or used in the table as a centerpiece arrangement.
Materials:
- Decorative paper
- Scissors
- Glue
- String
- Clothespins
Instructions:
- Start with a square sheet of paper in the size you prefer.
- Fold it in half.
- Fold one side in by half an inch.
- Continue folding down the length of the sheet accordion style. Repeat until you reach the end of the paper.
- Make sure the first and last fold are facing the same direction if you’re using paper that shows the design on only one side.
- Tie a length of string around the middle of the paper and secure it tightly with a double knot.
- Fan out each side of the string, then glue the edges together. Keep it closed using a clothespin until the glue dries.
- Let the glue dry for 5-10 minutes for each fan before removing the clothespins.
- Repeat the process until you have as many fans as you need.
Fairy lights in a bottle
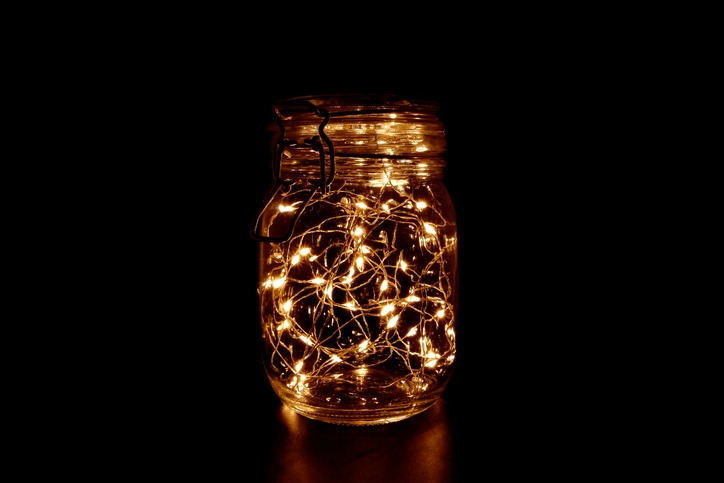
This one’s pretty straightforward! If you have lots of empty wine bottles or mason jars at home, put them to good use and make them a twinkly decoration for your holiday gatherings.
Materials:
- Battery-operated fairy lights
- Wine bottles or mason jars
- Twine
Instructions:
- Clean the bottles and remove the label. Make sure it’s dry before proceeding to the next step.
- Turn on your fairy lights and stick them inside.
- Hang the bottles up from the ceiling using twine. You can also simply use it to decorate the tables and your fireplace mantel to make a cozy atmosphere.
Garland cake topper
Cake toppers work well if you want to keep the cake simple without any written message on it but still want it decorated. Putting a garland on top of a cake is a great idea to keep it festive. If you’re hosting a spring or a summer bash, consider this colorful addition for your dessert table.
Materials:
- Colored paper
- Two wood skewers
- Hole punch
- Acrylic paint
- Colored thread
- Needle
- Hot glue gun
Instructions:
- Cut out colored circles and sew them together to make a circle garland. Make 3-4 garlands of different lengths. Make sure the shortest one is longer than the length of the cake where you plan to put the garland.
- Paint the skewers in colors similar colors to your circles. Let dry.
- On one end of the circle garland, glue it to the skewer. Do the same on the other side.
- Attach more layers of the garland to the skewers.
- Stick the skewers into opposite sides of the cake.